Managing Editor
When the winter months cut into my range time, there are two activities that keep me occupied on snowy days; dry fire practice and deep cleaning my guns.
During the shooting seasons, I clean my guns frequently by field stripping them down to their basic elements and giving them a good scrub. But, deep cleaning involves totally tearing them down to every pin, spring and component and going to town.
Guns that get heavy use, as mine do, build up carbon in tiny nooks and crannies and over time, these build-ups can affect accuracy, performance and reliability. By completely tearing them down, you can get into places that aren’t possible by simple field stripping.
Since there are thousands of types of guns on the market, I won’t get into the details of tear-down for all of them. There are thousands of videos on YouTube that provide detailed instructions for breaking down your gun by make and model.
 While standard field stripping is sufficient for most cleaning tasks, giving your guns a deep cleaning by completely disassembling them every so often will keep them performing and extend their life and improve their reliability.
The first step is to dissemble your gun in a way that won’t damage it or cause you to lose the small parts. Create a safe work space with ample light and no clutter. A towel or other soft material, like a gun mat, will keep your parts from rolling around and minimize the risk that you will lose them.
The best description I have ever heard for small parts is that they tend to be concrete soluble; as in they vanish into thin-air once they hit the concrete. I imagine when I finally move and clean out my garage, there will be thousands of tiny springs and AR detent pins swept up around my work bench. Take special care to prevent small springs and parts from flying off of the gun as you disassemble it.
Some special tools will also help. A good quality armorer’s tool kit, like the ones from Wheeler Engineering, will provide you a multitude of hollow ground, flat head screw driver bits and other tools specifically designed for working on your guns. A polymer or plastic armorers block, with grooves and holes for capturing driven pins, will allow you to contain your pins and not mar the finish. A set of rubber vice clamps will hold your guns in place in your vice without marring the finish. A set of steel, brass and plastic tipped punches and a good brass and Delrin hammer will complete your specialty tools. Regular tools like a pair of needle nose pliers, vice grips and a set of handled precision picks will also come in handy.
Make sure your gun is unloaded. Remove the magazine and check the chamber. Now check it again. Check it one more time, just to be safe. For long guns, drop the magazine plate and work the bolt. Now visually inspect the chamber. Now, point the gun in a safe direction; the concrete floor, the basement wall, etc. and pull the trigger, making sure that there are no valuable body parts between you and the indestructible surface you are pointing the gun at. If it goes click, you may proceed. If it makes a louder noise, you may need to consider going back to a basic firearms safety course. There is no shame in this.
Using your chosen source, disassemble your gun into the smallest pieces possible. If a multi-part component can be stripped down even further and you can find a source to show you how, then take it down as far as you can. Once the gun is completely dissembled, the real cleaning can commence.
There are a few ways you can achieve a very clean gun, but I use three primary techniques; manual, sonic, and chemical.
 Getting into all the nooks and crannies while main components like trigger assemblies are still connected isn't possible. To really get them clean, you need to remove them from the frame
For manual cleaning, I break out my Otis All Purpose Receiver Brush. The large toothbrush-like head is great for general cleaning, but the very small bristles on the other end are excellent for getting into tight places. Using some good old Hoppes 9 and some soft cotton patches, I wipe down all of the larger parts with solvent. Very tiny parts get dropped into solvent in a clean container to soak. My favorite gun cleaning solvent holder is the bottom of an empty water bottle that has been cut off about 3-inches from the bottom. This lets me soak small parts and then also dip my brush and patches into it without contaminating the entire bottle of solvent.
Once every part has had a chance to soak in the solvent, get scrubbing and wiping. While you will notice carbon being removed, don’t be disappointed that the parts don’t shine bright like when new. The heat from repeated firing will discolor the milder metal parts inside, and that is to be expected.
 That sonic cleaner is for cleaning more than just cases. It is also a parts bath and is a great way to deep clean all of your gun parts. Swap out your case cleaning solution for a heavy duty degreaser and parts cleaner.
For sonic cleaning, I use my Hornady Magnum Sonic Cleaner. Not only is this a great tool for washing and prepping brass for reloading, but with a serious degreaser and parts cleaner, the combination of heat and sonic vibration gets everything squeaky clean. You can either use a purpose-made gun cleaner and degreaser or I use diluted Simple Green, because I prefer the cost and the smell. I turn up the heat to its maximum setting and put it in for its maximum time. The very small parts will fall out of
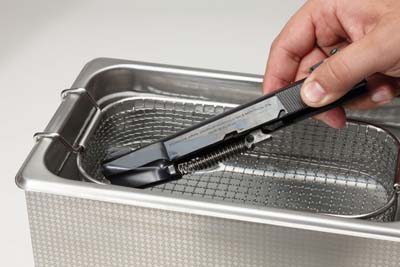 the basket into the main tub. This isn’t a worry if you do a single gun at a time and make sure you collect all of the tiny parts. I accomplish this by dumping the cleaning solution into a tub through a kitchen sieve.
The third method is to use a product like Gun Scrubber or Hoppes Gun Medic Cleaner and Lube. Using Hoppes Gun Medic accomplishes two vital steps; cleaning and providing lubrication on your parts. The Hoppes’ lube is a spray lube that leaves your gun feeling silky and smooth once it dries.
 Once the gun has been thoroughly cleaned, this is a great time to generously lubricate all of its parts. Deep cleaning will remove every bit of lubrication, so a good application of your favorite lube is needed at this point in the process. I like to use Tetra Gun Grease on the springs and slide rails. I find that this holds up well in the cold and continues to lubricate even after firing a lot of rounds. My choice for fine oiling is Marine Tuf-Glide from Sentry Solutions with a needle oiler. For areas that get heavy carbon build-up, I like Fire Clean. Whatever product you use, ensure that it will be hydrophobic and penetrate well into the micro pits of the metal to prevent rust if it is stored in a damp environment.
This is also a good time to check the parts for wear. Pay special attention to the springs and firing pin. Check the ejector and extractor for wear, chips and cracks. Parts for most makes and models of guns can be acquired either through the manufacturer or, for out of production guns or generic guns like AR15s, through third party suppliers like Brownell’s. A good spring tester, like the one available from Secure Firearms Products, will let you test the spring tension to determine if it needs to be replaced.
 Every gun is different, so make sure you have a reliable source of information on how to get it apart and back together again. YouTube is a great source of in-depth videos on how to get your gun fully disassembled.
Now comes the part where everything has to be reassembled in the proper order. Choose your assembly source book or video and carefully follow the directions. A good source will tell you of any tricks or tips you need to know, like properly aligning the hammer strut on a Ruger Mark I, II, or III pistol or getting each finger of the sear spring in the right place on a 1911. Just as when you dissembled the gun, make sure to keep control of tiny springs. I still haven’t found the spring wrapped titanium firing pin for my Springfield Custom Pro 1911 that went on a trajectory course in close orbit to the moon about a year ago. Have your username and password for Brownell’s website handy in case you need to order a replacement part in a hurry.
Once everything has been reassembled, make sure you function check the gun several times to make sure everything is back in its proper place and working the way it should. Make sure the gun goes back into battery; it easily fires, the slide or bolt operates as it is supposed to, the safeties engage and disengage properly, the trigger feels right, the slide doesn’t lock open when cycled without an empty magazine in place, and all of the controls do what they are supposed to do. It just takes one minor misalignment or one backwards spring to bring your gun to a screeching halt.
Finally, use a good silicone-free product to wipe down the outside of the gun and remove any fingerprints. I like a Marine Tuf-Cloth for this, but some Hoppes Gun Medic or Hornady One Shot Gun Cleaner with Dyna Glide sprayed on a microfiber cloth and wiped over the surface will protect the finish and remove any oils or acids from contact with your skin. Once that is done, give the gun a last wipe down with a dry cloth and handle it as little as possible while you put it away into storage.
One last step that I find helps save the finish on my gun is to give my holster a good cleaning as well. If using Kydex or plastic, put it in the dishwasher on the top rack with a grease cutting detergent. If using leather, rub in a good leather conditioner and coat the inside with some Galco Draw EZ Solution for a slicker glide in and out of the holster. If there are mechanical parts on the holster that need lubrication, be sure to use your needle oiler to get lube into the tight spaces with the springs.
Just because it is too cold and snowy to get out and practice doesn’t mean that you have to lock up your guns for the winter. Proper care and maintenance will ensure that they can continue to serve you for many years and be passed down to future generations.
