Managing Editor
WARNING: READING THIS ARTICLE MAY CAUSE THOSE WITH ADDICTIVE PERSONALITIES TO ENGAGE IN BUILDING MULTIPLE RIFLES AND LEAD TO AN AWESOME COLLECTION OF CUSTOM GUNS. DO NOT PROCEED IF YOU ARE PRONE TO HABITUAL TINKERING!
I like to tinker in my shop. I also like amazing custom rifles. I am also not made of money. These three characteristics combined, make for the perfect storm when it comes to building my own AR-style modern sporting rifles (MSR).
For those who are handy with basic tools and really want a high-performance rifle, building your own MSR makes far more sense than buying a factory rifle off the shelf. When I first started down the road of building custom guns, I was very unsure about the process, costs, tools and the scary, “not knowing what I don’t know” aspect of the endeavor. I spoke with a world-famous rifle maker and asked him how I should go about getting the knowledge I needed to do my first build. His advice was spot on, “just build it.”
The main benefit of building your own rifle is that you can spread the cost out over several weeks, months or even years, as you collect the parts over time according to the dictates of your budget. Because you are assembling them together, you can buy more rifle for less money this way.
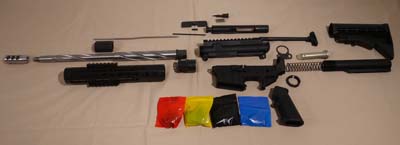
The AR-style MSR is so ubiquitous that parts are aplenty and there are thousands of videos on YouTube to walk you through each step, in detail. The first step is to collect the parts you want to assemble. We have included a downloadable parts list HERE with check boxes to help you gather all of the necessary pieces of your MSR. These are general parts and the specific features of your parts will vary based on function and manufacturer.
I suggest for your first build, starting simple. Gather all of the necessary pieces and keep them organized in a plastic bin or tote, until all of the parts are together. Lay everything out on your bench in the manner they will be assembled and double check your list to make sure everything is in place, before you begin the assembly.
 PARTS
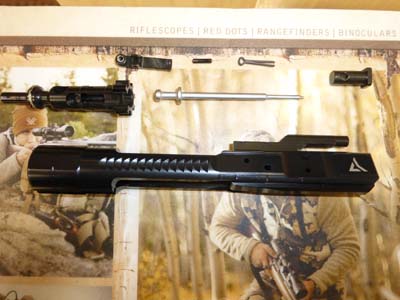
PARTSFor a standard AR build, the only piece that the law considers to be the gun is the lower receiver. This is the part that you will have to do a background check on to purchase from a licensed federal firearms dealer. Every other piece of the gun, including the pins, springs and other small parts that attach to the lower receiver, are considered accessories and can be ordered online and shipped to your home or picked up at your local gun store over the counter. A mail-ordered lower receiver will need to be shipped to a FFL and you will have to fill out an ATF Form 4473 and have a background check and pay a transfer fee to buy.
The rest of the parts are pretty standard and the list on our website will walk you through each and every part you will need. Some of the smaller parts will come in a kit, such as the lower parts kit (LPK), which makes it easy to gather the necessary pieces quickly and make sure you have everything you need. Some parts may be available discretely or combined into a single unit, such as the bolt carrier group (BCG). It is also important to make sure whether parts needed for installation of other parts are included together, such as a crush washer for a flash hider or a roll pin for your gas tube. Not all manufacturers include these additional parts and some do.
 The lower receiver is the part that the ATF considers to be a gun and the only part that needs a background check to purchase.
TOOLS
To build your own MSR, you will need some basic hand tools and a good heavy vice that is bolted to your workbench.
Because you don’t want to mar the finish of your parts, you will want to either pad your jaws with tape or get some plastic or rubber vice jaws. Some vice blocks to hold your upper receiver in place and a magazine-shaped block to hold the lower receiver will also be essential.
You will also need a variety of punches to drive pins. A good set of roll pin punches will save you many bad words, lost parts, delays and frustration. With your punches, you will want a hammer with plastic on one side of the head and brass on the other.
One solution to gathering all of the specialty tools is to purchase the Wheeler Engineering AR-15 Armorer’s Professional Kit. This kit includes everything you could need to assemble your parts into a functioning rifle. Any tool required to build your MSR can be picked up at your local Sportsman’s Warehouse store.
 ASSEMBLY
The actual assembly of the rifle should go fairly smoothly, provided you have all of the proper parts and tools ready. Also, make sure you watch your video of choice all the way through, so you can see the proper sequence of assembly. Since certain steps require other steps to be done prior, it is important to assemble everything in the right order. Otherwise, you will find yourself undoing what you have done to re-do it in the correct order.
Make sure that you start your work in a clear and uncluttered workspace. Because there are several parts that have captured springs, it is easy to launch a pin and have it vanish. Many of these pins are concrete soluble and will vanish forever once they contact the floor.
There are a few steps that can damage the finish of your gun, so having some patience, the proper tools and painters masking tape handy, will save you from having to refinish your gun once the build is complete.
When it comes to attaching the roll pin to the trigger guard, make sure the wings on the lower receiver are fully supported as you drive the pin. Otherwise, it is very easy to snap the thin metal protrusions off of the rest of the receiver. Do this once and you will never drive a pin without a block of wood under the wing again.
The total build time should be anywhere from one to two hours and doesn’t require machining. Since all of the parts are within standard specifications, everything will pin or screw together easily. And always remember your dad’s advice that if it doesn’t fit, don’t force it. The mildly soft aluminum in the receiver is easy to break or deform, ruining the entire piece. Also, because many of the pins and springs look very similar to one another, if you aren’t paying attention, it is easy to confuse them and try to drive the wrong sized pin into the hole. If it is snug, a drop or two of gun oil will help and make sure you are driving them straight and not cocked at an angle. Take your time, follow the techniques in your video and use the extra tricks they show you such as taping a pair of vice grips and letting them squeeze in the bolt catch spring rather than driving it with a punch. These tricks were learned from expensive trial and error.
TIPS AND TRICKS
Speaking of tips and tricks, here are a few that will help you avoid costly mistakes.
- Make sure the parts you are using are the correct size. Some buffer tubes are MilSpec and others are consumer sized. When you try to put on the stock, it may not fit or be very tight if the stock and tube are not the same size. The standard 5.56mm AR barrel uses a 1/2 x28 thread for the flash hider or muzzle break. Don’t try to use a 7.62 flash hider on it. They take a 5/8 x24 thread.
- Check your gas tube length. The gas tubes come in various lengths. When you purchase your barrel, it should tell you the size of your gas tube. If you are unsure which length you will need, measure from the gas hole in the barrel to the edge of the chamber and get a tube that is about 2-inches longer than that. Since there are four standard sizes of tubes, this is good rule of thumb to determine the proper length. Lengths are sold as Rifle, Carbine, Pistol, and Mid-length.
- Check your barrel diameter and profile to get the right gas block. The barrel profile should have a ledge that properly aligns the hole in the gas block with the gas hole in the barrel. If it is not profiled properly, you will need to align the hole in the gas block with the barrel manually and this is not an easy thing to do. You have to adjust it laterally as well as horizontally, to get it to align properly. You are much better off getting a properly profiled barrel until you get a feel for how the block and the barrel properly mate.
- Know the specs. There are a few places in your build where things have to be tightened to the proper amount of torque AND index properly. The torque range for the barrel nut and the flash hider are pretty wide, but it is better to err on the low side rather than the high side, because once the threads have all fully engaged, you will not get it to turn that extra 16th of an inch to properly align. If it is lined up and within specs, don’t try to get it tighter, hoping to get to the next index spot. You won’t make it and you may break something.
- Have fun. While we want to take our guns seriously, building a tricked-out AR, just the way you want it, is a lot of fun. Take some extra steps, like polishing the trigger, to make it perform even better. And even though one of the benefits of building your own is the money you can save, don’t cheap out too much on the parts. That LWRC lower is more expensive for a reason and you will appreciate the better quality.
- The barrel is the gun. While that $99 no-name barrel may seem like a good deal, the material the barrel is made from, the coating inside, the depth of the rifling, the harmonics and a whole lot more will turn your budget rifle into a bullet hose that can’t consistently group beyond 200-feet. I have gone to building my rifles almost exclusively with Bergara barrels, which are some of the best-made barrels in the world and usually only cost $50 to $100 more than cheaper and poorer performing pipes.
- Know what you want the gun to do. I build rifles with a custom purpose in mind. If I am looking for a rested varmint gun, I will make it heavier with a faster twist rate for the lighter and shorter bullet. For a tactical gun that is firing a 55 or 62 grain standard FMJ, I will go with a slower twist rate that is in the marginal range. For long and heavy bullets that I want to send a long distance, I will go with a twist rate on the faster end of the spectrum. This gives me more custom options than the standard 1:7 to 1:9 that is available from an off the shelf gun. Customize your options to your intended use, whether it is CQB, varmint hunting, big game, zombies, etc. Tailor your build to your intended purpose, unless you are just looking for a general purpose all around shooter, then use what you can get.And my final tip is simple. If you have been holding off on doing your first build, just do it. With the firearms market as soft as it is, parts are plentiful, inexpensive and sales are frequent. It may seem like some super-secret mumbo jumbo, but really it is a lot of fun and you get the satisfaction of shooting something you built yourself. And all of your buddies who don’t know how easy it really is will think you are some sort of Gun God. And really, isn’t that the best reason?
