The gear you need to get the job done
By Michael Deming
Shorter days, cooler nights, changing of the leaves, and the scream of the bull elk is a vision that lives very vividly in my head 365 days a year. As the last day of September comes to a close, I am already counting down the days until we can do this again. I guess you can say that I have a serious case of “Elk Fever” and I’m pretty sure that there is no cure.
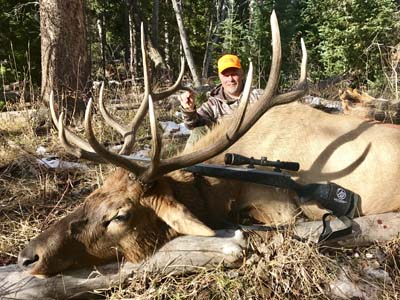 Last year, I got to sit in an elk camp with some hard-core veteran guides as well other seasoned elk hunters. The question went around the table of how many elk each of us had harvested over our lives and after some brief discussion, we pared that down to how many branch antlered bulls have you taken. Most had to think about it and add them up, but I’ve accounted for every bull I’ve ever taken due to this severe case of elk fever I have and when I said the number forty-five out loud to our group, there was a pause. "That’s a lot of bulls," was a comment by one seasoned elk hunter and another of the guides said, “I think I might have guided that many.”
A few things I have learned over all of this time in the woods is how to make mistakes. I’ve done it wrong just about every possible way you can think. However, you only truly fail if you quit and that’s something I never do. I just learn a little bit more on every outing. The other thing that I’ve learned is what gear is really essential to help me be successful. There are lots of products on the shelves which make things more convenient or comfortable, but I’ve got my mandatory list of items that go with me on all elk hunting trips. As new products come out, I usually test them out and weed out the old and add in with the new if it makes sense. Here is my list of necessary elk hunting items.

Both binoculars and spotting scopes are essential to elk hunting success. If I am in a new area and haven’t had time to pre-scout the area, I am going to live behind my optics. Elk are grazers and that green grass grows better out in the open pastures than in the trees. They will likely be seen in these open meadows, but as hunting pressure kicks in, they are going to come out into these parks and 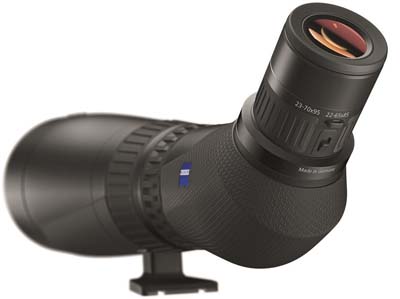 meadows later and later and leave them in the mornings earlier and earlier. This means that you need good quality optics that work well in low light. It also means that you need to look very far away in most cases. I am often looking for the tan bodies of elk at first light as far as 5 or 6 miles away and sometime further. I personally use Zeiss Victory 10x54 rangefinding binoculars and the Zeiss Harpia 95mm spotting scope. Both are extreme top-of-the-line optics and I feel they tip the odds in my favor for finding animals in low light; but whatever fits your budget in this department is much better than not having these tools at all.

Whether you are hunting with a bow, muzzleloader, or a rifle, your best chance for success when the time comes is to know the exact distance to your target. Unless you are a master at range estimation, you are taking a major chance of wounding a great majestic animal and that’s not a risk I like taking. I want to know the exact yardage to my target regardless of the weapon I have in hand. I already carry a set of rangefinding binoculars with me in the Zeiss Victory RF 10x54's, but I am so emphatic about making sure to be precise that I always carry a backup. SIG, Leupold, and Vortex all have some extremely accurate, lightweight, and affordable rangefinders that will fit the bill.

It doesn’t do you any good to have high quality optics if you can’t hold them still and spend some time behind them. You can cover way more country with your optics than you ever can on your feet. Blundering through the dark timber hoping  to find elk was how I was raised, and I quickly learned that this isn’t very effective except for people sitting behind their optics watching me jump elk. I like a good quality carbon fiber tripod like the Manfrotto. I like these to be a three-section unit that will allow me to not only sit down behind it but
  stand up and glass if the cover in front of me is too high. I put the Manfrotto 128RC micro fluid head on this and I do the same for my window mount. These are some of the very best fluid heads I have used, and I can also put my cameras on them when needed. Having identical heads on both my window mount as well as my tripod allows me to keep the same base on my optics and if I am spotting from the truck, I can grab them and head out quickly without needing to swap out bases. This is a system I have utilized for over a decade and it’s a solid plan.

You are going to need a daypack with a decent amount of capacity when you hunt elk. It isn’t uncommon to hike 10-20 miles on a serious day of elk hunting. The mornings are usually cool and damp and require extra clothing, but you will gradually heat up and need to shed those clothes as the day goes on. Afternoon rain showers are a common thing in September, and you will definitely want to have quality rain gear with you. The other needed accessories, which I will list below, as well as food and water for the day, takes  up a lot of space. This requires a pack that is both large enough to carry all of your gear as well as adjustable and comfortable. It is even better if it has the ability to expand and get some of your elk out on your first load if you are successful. I personally carry the ALPS Outdoorz Traverse X pack out of their extreme line as it accomplishes all the above requirements for me. Once I get that first load back to the truck, I am definitely going to want an external frame pack for hauling the heavier loads of meat, head, and horns out. The Trophy X by ALPS is a great meat hauling frame pack with a lot of adjustability to make that heavy load as comfortable as possible. It is extremely important to find a pack that fits you and your frame for these heavy loads. I also recommend having a set of trekking poles with this pack. They are extremely beneficial when you are hiking those heavy loads on uneven ground.

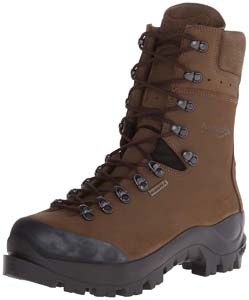 This is truly where the rubber meets the road, so to say. You want a good pair of hiking boots that have been broken in well before the upcoming elk hunt. Ten plus miles a day can cause severe damage to your feet if you are working with a substandard pair of boots. If your feet take too much abuse, you will spend the rest of your elk hunt back at camp and be eating tag soup. High quality boots like Kenetrek Mountain Extremes or Zamberlan 980 Outfitters are proven and dependable and I have both. I’m often asked, “What is the best boot?” and I can always answer, “What is the best boot for me?” I know my own foot shape as well as the hot spot areas I have identified over the years. I also know tendencies of different manufacturers and how those boots work for me. My foot is narrow at the back and wide near the toes and if they were orange, I would surely be a duck. I almost leave two separate tracks when I get out of the pool, which tells you how high my arches are. If your foot is identical, I can give you a recommendation, but you are better off trying on multiple high-quality boots that have been proven performers for other hard-core hunters. Pick the one that fits your foot the best and get fifty-plus miles on them before it’s time to hunt.

There were lots of elk harvested long before camouflage came about, but the development and overall advancement of these clothes has made a huge difference, especially for those of us using shorter-range weapons like bows and muzzleloaders. In addition to being camo, the clothing has become so much more technical. Sitka Gear was the innovator in this field back in 2005 and I still have some of those old Mothwing pattern original pieces today. Both 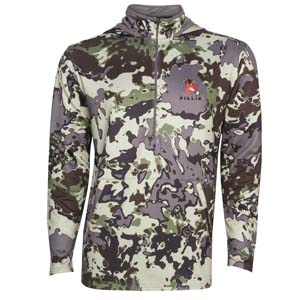
 the patterns and the functionality of these pieces of gear have come a long way. During this month of September, layering is essential to keeping your scent minimized as well as staying warm, but not hot. I have a full Sitka Gear layering system which keeps me comfortable and dry in absolutely every elk hunting climate I visit. As we move into the colder months and those bulls are on those wind-swept ridges free from snow, it’s extremely cold waiting for a shot opportunity. The multiple layers help break the wind and insulate you from the cold. Granted, it does take a small fortune to purchase a complete set, but you will never complain when you are sitting on the mountain and it’s raining cats and dogs, but you are dry as a bone and waiting out that giant 6x6. For the more budget-minded consumer, the Killik Gear line of technical clothing has two great patterns to choose from, K1 and the Veil Big Sky, and performs really well.

Elk hunting often requires you to leave camp in the dark and you are often not back until it is dark again. The GPS has features that allow you to mark this destination as finding your way back. You can mark waypoints, which are places that are beneficial to your elk hunting success. This could be a wallow you have found, active game trail, an area torn up by fighting bulls, or maybe a trail camera you decided to install. The unit that I like and use personally is the Garmin Rino 755T, which comes preloaded with topographical maps. It also has a two-way radio that allows me to communicate with other hunters in our group. If they have any other Garmin Rino (not just the 755T) as well, I can program them into my system, and it will show their location on my screen. This makes finding fellow hunters very easy; especially in the dark. I also like to have onX hunt software on this GPS unit as well as on my smart phone. This software provides you a map overlay showing the ownership of the land. It shows public, private, state lands, BLM, and Forest Service. This is a great tool when you are hunting a new area and come across a fence and the elk are just over the hill. You can now determine if this is public land or if you will be trespassing. This software has been a game changer for me going into new areas and figuring out where to hunt.

The laws on trail cameras are different in every state, so make sure you check the rules of your state on these great tools before you hit the field. If the state in which I am currently hunting allows me to have trail cameras in the field during the season, I never leave camp without at least one that is all set up and ready to go. This allows me to have an extra set of eyes with me at all times. If I find a heavily used trail or a fresh wallow, I can hang this camera and get data on what is hitting these spots. This will tell me if it is worth my time to sit here in the future. I’ve always used trail cameras for scouting areas but started taking them with me on hunts about a decade ago. I usually have half a dozen or more in camp. There are numerous different brands of cameras to choose from in today’s market, but I’m currently utilizing the Browning Strike Force Apex. I like them because they will accept very large SD cards (up to 512GB) which allows me to take lots of photos or video and get as much data as possible. They are relatively small and carrying a couple of them in my pack doesn’t take up much room.

Getting an elk to call back to you and actually come in for a shot is probably one of the most exciting things I’ve ever done. This requires a ton of experience and even more practice that your family, friends, and neighbors are thoroughly going to hate. Listening to elk in a real-world environment and seeing how they communicate is the best experience possible as it allows you to read body language as well as see the sounds coming out of their mouths while they posture. If you can’t make a visit to Rocky Mountain National Park during the rut to get some skills, you can watch plenty of it on YouTube. The biggest teacher of calling is making mistakes in a real-world environment. Elk that live on public land talk and act much differently than those elk in the park and on private land. However, getting good sounding calls and learning how to perfect the sounds they make the most is a good start. When I was a kid, Wayne Carlton was putting out videos on how to successfully call elk. In my eyes, he was a god and had mastered elk talk like nobody’s business. Living in Montrose, Colorado, he was developing calls and testing them in the field. For decades he perfected his calls, his craft, and made lots of mistakes. Thirty years later I got to meet with him and since I call him my friend. I utilize nearly every call and decoy that he and his son Marc manufacture under the name “Native by Carlton”. The Green Weenie is one of the purest sounds out there and I’ve always got one in my pocket and a backup in my pack.

Leaving camp in the dark and coming back in the dark is common practice, as stated above, when elk hunting. You are often going through deadfall or narrow paths and a fall could be fatal. Being able to see is essential. I like to carry both a headlamp and a flashlight with me in my pack at all times. The new Black 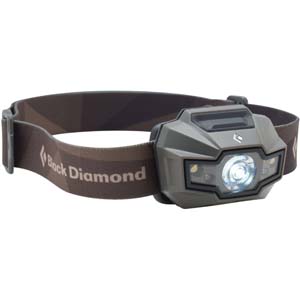 Diamond Storm 375 is an excellent light and operates off of four AAA batteries and I also carry an extra set of batteries. It has red, green, and blue night vision modes and the 375 lumens is extremely bright when you need to light up the area to cape out a bull or find a blood trail. My flashlight is a Hybrid Light Journey 600, which is a rechargeable light. It is extremely lightweight and also doubles as a power pack for recharging my cell phone should it go dead. It puts out 600 lumens and will run for 6 hours at this rate. It is ideal for someone watching for bears as the other person capes and quarters and elk.
 KILL/SURVIVAL BAG
This bag has all of my essentials in it that are going to be needed if I’m successful on my hunt or end up needing to spend the night out in the field. This actually happens fairly frequently and should be something you embrace. It will increase your success a lot. When you have been trying to find elk all day and you finally turn up a herd, the last thing you want to do is leave them. Being in a position to be close enough to keep track of them, but not spook them has you ready to strike in the morning. You will need some basic essentials to do this and they are all in this bag. First and foremost is a lightweight tarp. I used to carry the Mountainsmith Mountain Shade Tarp until Sitka Gear just came out with their new Flash Shelter. These are lightweight tarps and if you need to get out of the weather and spend the 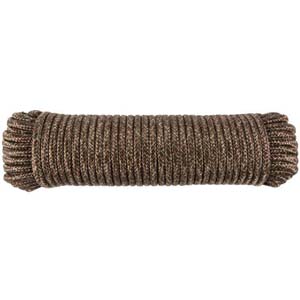 night, these will do a great job of breaking the wind or keeping you dry. When I’m successful on my hunt, I will lay my quartered and boned out meat onto these tarps to keep it clean and dry. I also carry 100 feet of 3/8-inch polypropylene diamond braided rope. I use this for helping to set up the tarp for a shelter and for hanging quarters in the air to get them cooled down. This is enough rope to get all the quarters of an elk up and out of the reach of bears if you are in bear country.
 Game bags are essential to keeping your meat clean and flies from getting into them. Caribou Game Bags are extremely lightweight as well as reusable.
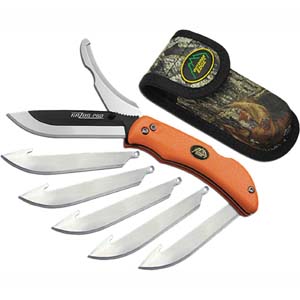 I always have multiple knives in this bag as well as replacement blades for my Outdoor Edge Razor Pro knife. I carry a 7” folding Flip n’ Saw from Outdoor Edge as well. This can be used for taking out the skull plate, clearing the area for photos, building a shelter, or cutting up firewood.
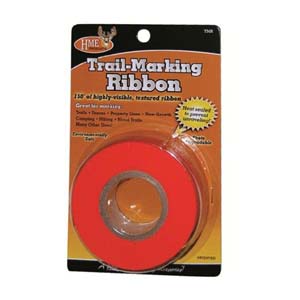 Fluorescent ribbon is great for marking blood trails and I also have at least two
 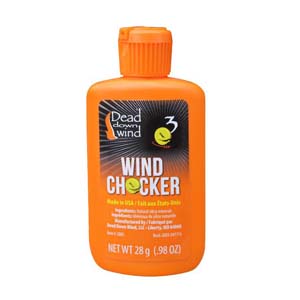 windicator bottles in this bag. I know that this is an essential part of mountain hunting and I know I will always have one with me as I’m never leaving home without this kill/survival bag.
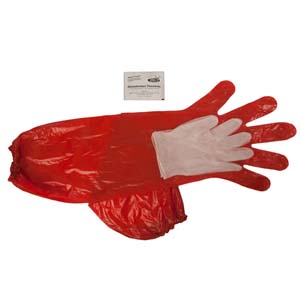 Surgical type rubber gloves (4-5 pair) keep your hands clean. I keep one pack of disposable wipes which have numerous great purposes in the field. However, once you are successful, it is great for wiping blood off of your trophy to get quality field photos which aren’t offensive to some.
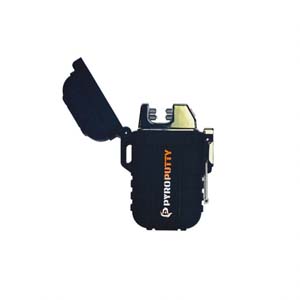
 I always have some means of starting a fire in this bag. Pyro Putty and the rechargeable Dual Arc Electronic Lighter (found at your local Sportsman's Warehouse) are great resources for this and have found their way into my bag.
I’ve always got a fine-tipped Sharpie in a Ziploc bag as well as a small roll of electrical tape. These are essential when you need to sign your tag and attach it to the carcass to be legal.
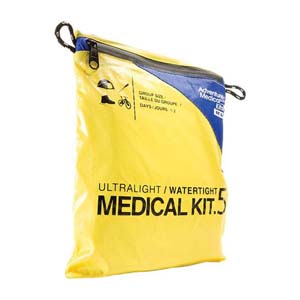 I close out the bag with an Adventure Medical Kits first aid kit and a tube of sunblock and we are good to go.
With forty years of elk hunting experience under my belt, I’m sure that I’ve still got a lot more mistakes to make, but hopefully this essential gear list will help you not make some of the same mistakes that I have made. Hopefully you will greet this elk season a little more prepared.
