Two alternatives for cooking your turkey to save room in the oven for more pie.
By Dan Kidder
Managing Editor
I am kind of obsessive about pie. Don’t get me wrong, I enjoy some moist turkey and a dollop of mashed potatoes the size of a bear’s head, but for me, the holidays are all about pie. It never seems that there is quite enough pie during Thanksgiving dinner. One of the reasons for this, is the turkey takes up most of the oven for most of the day. To make room for more pies, I searched for two alternatives to oven roasting to make superb turkey the family will love.
 Deep fried turkey is a quintessential experience. Be wary that if left unattended, the bird may be stripped bare of her crispy skin. Also, this method of cooking turkey may spoil you for traditional roasting.
Deep Frying
Crispy skin. Who doesn’t love a turkey with perfect crispy skin on the outside? The problem with many ways of roasting a turkey is that to get a perfect crispy skin, you risk drying out the meat on the inside. Deep frying your turkey solves this conundrum and is one of the fastest ways to cook turkey you will ever find.
For my turkey frying, I went with a Camp Chef High Output Cooker and a 32-quart pot. First lesson is that a smaller pot, like the Camp Chef 24-quart pot, requires much less oil. Since the oil runs about $30 for three gallons, this would be a benefit. With the turkey in the pot, it took just under 6 gallons to cover the bird for frying. It also takes longer to get your oil up to temperature with a larger pot.
Your first step when frying a turkey is to make sure that it is completely thawed. If there is even the tiniest bit of ice still in the bird when it hits the boiling oil, it will flash into steam, exploding superheated oil on anyone in the vicinity. A good way to ensure that the turkey is fully thawed is to brine it for 24-48 hours prior to frying.
Take your thawed turkey and place it in the pot. You can use the basket that comes with your pot or in my case, I picked up a King Cooker Turkey Rack and Lifter from my local Sportsman’s Warehouse. This rack gives a better vertical orientation and maintains it straight up and down through the frying. I don’t know if this helps it cook better, but I know it keeps it at the bottom of the pot and doesn’t let it bob up and down in the basket.
Once the bird has been placed on the rack, place it in the pot and add water until the bird it totally covered. Do this on the rack as the rack also displaces water. Remove your bird and then measure the water in the pot. That is the amount of oil it will require to cover the bird for frying. Drain the pot of water and dry it thoroughly. You don’t want any water in the pot. Remember the steam, burning, pain, screams? Get it dry.
After your pot is completely dry, put it on your burner and add the same volume of oil as the water you removed. Be pretty precise with this. Too much oil and you can overflow the pot when you put the turkey in. Too little and part of your bird will remain above the oil and might not cook all the way.
Once your oil is in the pot, cover it and light your burner, turning it up to high. Add a frying thermometer through the hole in the lid. You wondered why there was a hole in the lid, didn’t you? Let your oil heat. You want it to be at 350 °F (177 °C). The oil I like to use is a blend of Soybean and Peanut Oil from Cajun Injector. The higher smoke point makes the oil safer to use than vegetable oil, it tastes better and leaves a nice dry crispness to the food you fry in it. While it heats up, you can prepare your bird.
 An injectable like Cajun Injector's Creole Butter adds spice and flavor all throughout your bird.
I like a flavorful and juicy turkey, so I typically will inject it with a seasoning blend. My flavor profile of choice is Cajun Injector Creole Butter. This tangy blend is the perfect companion for foul. After you have dried your bird of the water you used to measure the volume of the pot, take your injector in hand and squirt your delicious injectable of choice throughout the bird. I like to use the entire jar, evenly distributed throughout the turkey.
Once your oil has reached the magic temperature at which it turns all things it contacts into a scrumptious morsel (ever had a deep-fried Twinkie?) you are going to turn off the burner. Some people don’t do this, but I prefer to be safe rather than sorry. Your turkey still has some moisture in it and this will make the boiling oil roil and splash. Make sure you are wearing long pants and closed shoes for the next step. Long sleeves wouldn’t hurt, and some leather cooking gloves are always a good idea. With your turkey returned to the rack, using your lifting hook and a silicone oven mitt or the gloves, slowly lower the turkey into the pot, using the lid as a spatter guard to protect your face.
 Slowly lower your turkey into the boiling oil, using the lid as a splash shield. Let the bubbling subside a bit before finally setting the turkey completely in the pot. Hot oil burns.
Don’t just drop it in, but put it in a little at a time to let the enthusiastic roiling die down a bit before proceeding deeper. Once you have most of the bird submerged, you can finish your dunking. There will be some spill over, so make sure you set up your cooker in the grass or on a surface that can easily be cleaned.
Re-light your burner, cover your pot and cook your turkey for three and a half minutes per pound. You heard me right, in about 45 minutes, your bird will be done. Told you it was the fastest way to cook a bird. You are looking for an internal temperature, in the thickest part of the breast, of 180 °F (83 °C), using a meat thermometer. If it isn’t quite there yet, put it back and relight the burner, letting it cook for a few more minutes until you have reached the safe temperature.
Turn off the burner, remove the turkey carefully and set it in a roasting dish on a heat resistant surface to let it drain for a few minutes. Let the bird rest for 15 minutes before you carve it. During this time, you may wish to post an armed guard to prevent hungry bystanders from stripping your bird of her crispy skin. I will also warn you, that once you have tasted a fried turkey, you may be spoiled for turkey cooked in a traditional manner.
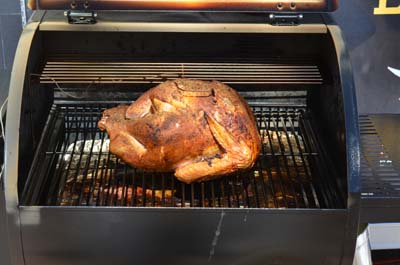 Smoked Grilled Turkey
People don’t realize that their pellet smoker is a super-efficient oven and grill, as well as a way to slow smoke meat. For our bird, we used the new Camp Chef Woodwind Pellet Grill and Smoker. We have a separate reviews of pellet grills in our Cooking Product Reviews section.
Because it uses premium virgin hardwood pellets to generate heat, it also generates flavorful smoke that rolls around the bird while it cooks. For this bird, I went with Applewood pellets to give a mild, yet slightly sweet flavor that won’t overpower the mild flavor of the turkey.
To prepare my bird, I brined it for 24 hours, injected it with my Creole Butter and then rubbed the flesh with soft butter. On top of the butter, I coated it liberally with some of Hi Mountain Seasonings Poultry Rub Blend. It is the perfect companion for chicken, turkey, or upland game birds.
I started my Woodwind at 500 °F (260 °C), which is at the maximum end of its operating range. I placed the turkey in the center of the large grill surface and closed it down. Because the computer on the Woodwind precisely measures both the cooking temperature as well as has a probe to measure the internal temperature of the food, I was able to walk away and go bake a few pies with the room I had in my oven. I set my timer for 30 minutes to let the scorching hot pellet grill crisp up the buttered skin of my bird.
After 30 minutes, you cook your bird just like you would in the oven. I reduced the Woodwind to 375 °F (190 °C) and cooked it for 15 minutes per pound, subtracting the 30 minutes I crisped it. The internal temperature probe let me know when the thickest part of the breast next to the bone had reached an internal temperature of 180 °F (83 °C). Remove your turkey and take a bow as people “ooh and ahh” over the magnificent Norman Rockwell beast you have placed upon the table.
Whether you fry or smoke your turkey, the flavor is outstanding. The one down-side is that there are no drippings to make gravy. But, the upside is all the room in your oven for pumpkin, cherry, pecan, peach, apple, strawberry-rhubarb, lemon meringue – PIES!
